Wednesday, January 30, 2013

Painting Update - WWII

I'm so sorry for that.

Anyway, I've finally gotten Curt's Fallschirmjager painted and coated, which means in addition to his StuG's and Tigers, he's got everything he owns for FoW painted!

So here's some shots of the infantry:


Next is finishing up what what I own for my British (more tanks and a troop of Sextons), and then I'll most likely move on to my Germans.

Wednesday, January 23, 2013

Contested Ground - Flames of War AAR

Curt and I had another game of FoW recently (our last one before the end of winter break). Once again, my British and his Fallschirmjagers clashed in Normandy.


We decided we wanted a quicker game this time (and that backfired horribly), so we took a couple of simple 1000 point infantry lists with limited support. Oh, and by the way - everyone was painted! We did it! Woohoo!


I took a rifle company from the 51st Highland Division (Reluctant Veteran). I had 3 infantry platoons, a platoon of 6-pounder guns, a platoon of mortars, and a troops of Shermans.


The Germans consisted of 2 platoons of infantry (which kampfgrupped into 3 smaller platoons), a platoons of mortars, a pair of Pak 40's, and a pair of StuGs.

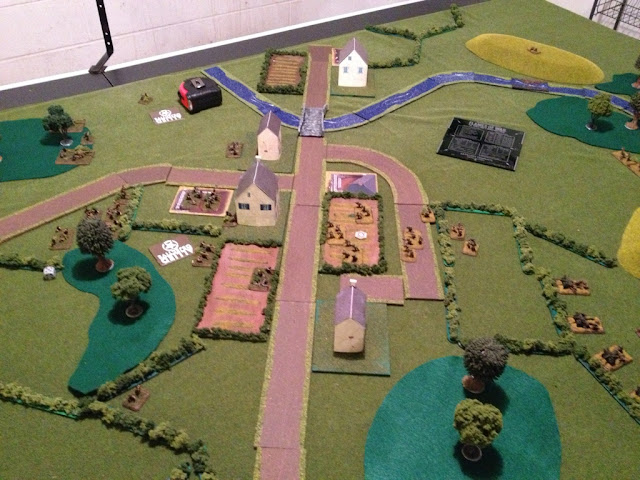
We rolled up Dust Up as the mission, and I was the attacker. I decided to hold two infantry platoons and the tanks in reserve, and Curt did the same.


My own plan was to have the guns take up positions in the nearby hedgerows. With AT 10, RoF 3, and the ability to engage infantry with HE, I would use them to hold back the Germans that would go after the two objectives in my corner. My infantry would go through the town, with the mortars backing them up. My hope was my armor and additional infantry would be the main attacking force.


Curt deployed his Germans much in the same way - infantry in the center, supported by mortars, and the Pak 40s holding down the other side.


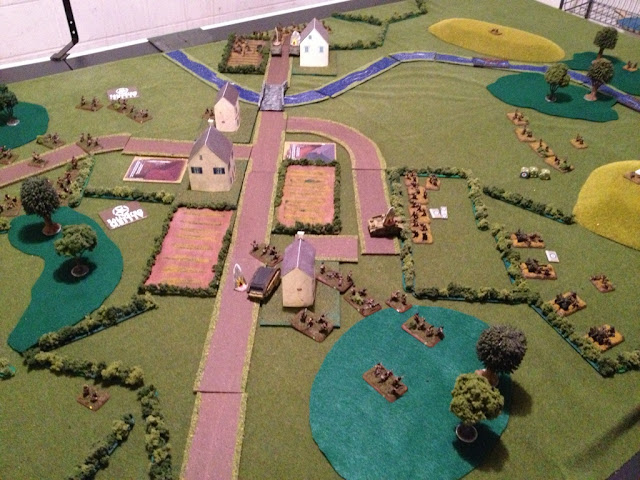
Not much happened in the first two turns. Both forces advanced on the town, with the mortars setting up and firing. The British mortars managed to pin down the German infantry, but they unpinned in their subsequent turn. The German mortars, however, failed to hit any of the advancing British infantry.


The Brits managed to close with a couple of teams that had advanced into the town and wiped them out, consolidating into the field in the center of the table. The returning German fire took revenge for their lost comrades, and then stormtroopered back into cover. I should mention that both sides failed to bring reserves onto the table.


The reserves failed to show up for the fourth turn as well. I decided to pull my infantry back out of the field. Curt's infantry dug in and his mortars pinned my infantry down.


My reserve troops apparently decided to break out the tea and biscuits, since they still hadn't shown up. The Germans, on the other hand, had already finished lunch, with the StuGs accompanying a platoon of infantry onto the table. The platoon of infantry I had just behind the field was pounded with MG fire, but managed to stick around.


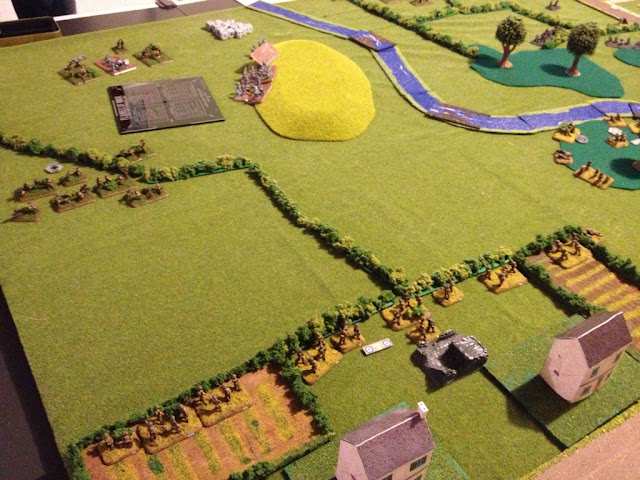
Finally, my reserves arrived! With a platoon of infantry and the Shermans pushing on the far side of the table, I still had to worry about my center. I had my infantry fall back further, and then covered them in smoke from my mortars. The Germans advanced, but the houses and woods kept them from firing. The last Fallschirmjager infantry platoon arrived as well.


Finally, the last of my reserves arrived. My Shermans started a long ranged firefight with their armored opposites, and managed to knock one out. I also had my infantry in the hedges dig in. The Germans shifted a little bit, but the remaining StuG failed to tag any of the Shermans.


Turn 8 saw a minor German victory. With my troops in the hedgerows buttoned up, I started advancing my other platoons in a conga-line to get them over the river. German fire, however, sees one Sherman destroyed and another bailed.


With my infantry still advancing on the river, my mortars decided to lay down some fire on the Pak 40's, and in a stunning round of fire, knocked both guns out and forced the platoon command team to run. The remaining Sherman attempted to deter the advancing Fallschirmjager with its MGs, but to no avail. The remaining StuG hit and destroyed the Sherman troop commander, and the remaining tank decided to run for it.


The remaining infantry platoons on the far side managed to knock out the Fallschirmjager company command team, the panzerschreck team, and the last remaining team of the platoon they were attached to. In return, the remaining platoon on that side forced a British platoon off, but the last StuG was lost due to defensive fire from the 6-pounders.

And with that, we reached the appointed end time. We decided the call the game a draw - Curt didn't have his company commander, but his remaining platoons could have done some real damage to my own force. Most likely, we decided, the game would have devolved into our mortar platoons exchanging fire for a while, and we didn't want to sit through that.

I blame the length of the game on the fact that we both played infantry companies, and because we both lacked fast-moving assets in such low-point lists. That said, I enjoyed the game, and it was a fun send off.

Thursday, January 10, 2013

Somewhere in the South Pacific, 1942 - General Quarters 3 AAR

Curt and I attended a demo game of General Quarters 3, a (relatively detailed) set of rules for naval actions in WWII. The game, hosted at the wonderful nearby 7th Dimension Games, was prompted with the following intro:

It’s 1942 in the South Pacific – almost a year after Pearl Harbor jumped the USA into World War II. The Imperial Japanese Navy is running supplies and troops to their army almost every night through the center of the Solomon Islands chain – The Slot – to try and retake Guadalcanal’s critical airfield. They have been ordered to “supply or die” and the US Navy is committed to stopping them. Every night a deadly game of cat-and-mouse occurs with the USN trying to intercept the Japanese ships and transports. The question is, who is the cat and who is the mouse?

The fleets were as follows, with all ships, except for one, being destroyers:
Japanese -
IJN Akatsuki (Me)
IJN Naganami (Curt)
IJN Kagero
IJN Isuzu, the light cruiser

American -
USS O'Bannon
USS Lamson
USS Fletcher

The Game
The game began with both sides getting an extra 'blip' to put on the table. Our GM informed us that, to the west (the far side of the table in the first picture), there was an island that would help confuse the American radar returns, so we decided to come in as a line from the North-west (little did we know the American would do the same!


Both sides attempt to acquire the other - while the Americans failed to acquire us, they did manage to detect our ships, so our positions were quickly revealed. Curt and I, however, showed our ability to roll low, and we both scored the necessary '1' on a d12 to acquire the American ships. This was quickly shared with the other two ships in our ad hoc squadron.


As the two forces drew nearer, the American manged to acquire all of the Japanese ships, apart from Curt's Naganami. The Japanese attempt to fire torpedoes, but a miscommunication has most of them turn out to be decoy launches. Whoops!


The Americans realized that their positions were off when the Lamson, the leading ship, made a complex movement that the rest of the ships in the squadron failed to follow. This being a demo game, the GM and table agreed to move the Americans into their proper positions. Torpedoes were (actually!) launched by the Japanese, and an amazing shot from the Isuzu flew straight and true... right into the Lamson, which was also the acting commander of the USS force.


The ships continued to approach, with the Americans getting their torpedoes in the water. The Lamson makes a daring move, opening up to full speed and attempting to move straight past the Japanese ships. It's during this action that the Akatsuki (i.e., me) made a bad call, using a spotlight to illuminate an American ship.

This unfortunately led to the Americans pounding the Akatsuki, and she lost both guns, two of her 3 torpedo-launching stations, and her spotlight. More worrying were the hits to her bridge and engineering, as well as a bulkhead breach. She wasn't crippled, however, and I began to move her out of the way of the battle once I got the situation under control (the Japanese needed a decisive victory to win, and I wasn't going to let the Americans take the Akatsuki as an easy kill).


The Lamson continues to speed towards the Japanese rear. The Japanese torpedoes, however, hit their mark, essentially crippling one of the American ships (the Fletcher, I believe). While the crew failed their morale roll, the ship herself was still capable of firing most of her guns, so the Japanese avoided finishing her off as she limped away at 5 knots.

Seeing the Lamson moving past, the Kagero and Naganami decided to break off and pursue, while the Isuzu began to turn.


In the end, the Lamson managed to get away, breaking into the Japanese rear. The O'Bannon took enough hits from the three remaining combat capable Japanese ships that the GM declared her effectively neutralized. A quick tally of victory points showed that the Japanese had won a morale victory, which would look good in the Japanese newspapers, but wouldn't help the war effort.

I have to say, I really enjoyed the game. If I had to nit-pick about something, it was the amount of charts that were necessary to play the game. However, my inability to pick up the charts was mostly likely due to the fact that the Akatsuki was knocked out and unable to do much in the middle of the game. Curt, on the other hand, not only picked up on the charts, but was soon showing the other players what to do when they were attempting to fire at one another.

In what may be the most telling show of our opinion of the game, Curt and I are now looking around for some 1:700 ships to put together (which would have been much easier had Herb's not closed, though in what seems to be some sort of heavenly-ordained coincidence, I did find and buy a copy of the Osprey Publishing 'USN Destroyer vs. IJN Destroyer, 1943' book. Weird).

Wednesday, January 9, 2013

A Desperate Withdrawal - Flames of War AAR

Curt and I had another game of FoW last Thursday, with Curt taking his same Fallschirmjager list from last time, while I took a confident trained British rifle company (as a side note, points value were 1505 and 1525, respectively.


The table featured a small village in one corner, a villa in the other, and a forest dominated the center of the table. An easily-forded creek split the table in two.


My British company consisted of 3 platoons of infantry, with 6-pounder AT-guns, mortars, and a couple MG's in support. Armor support came in the form of 2 platoons of Shermans and Fireflies, and a platoon of scout carriers.


Curt's Fallschirmjagers consisted of 2 platoons of Fallschirmjager infantry, mortars, and Pak 40s. In support were a platoon of Grenadiers and 2 Tigers.

The scenario we diced for was Fighting Withdrawal, in which the defender must hold the attacking force from taking any one of three objectives while taking platoons off the table for 8 TURNS - gah! Curt decided to take the offense, and so I began to set up my force (this turned out to be a smart move, especially since I had 3 more platoons to spare than Curt did, which meant the 'strategic withdrawal' mechanic would put us on a more even footing by mid-game).


British deployment.


German deployment.

The Game

With my whole force dug in and gone to ground, it's safe to say that I didn't do a whole lot in any of my movement phases. Curt, on the other hand, had his Germans dancing back and forth across the table.


The fighting on my left flank saw the complete destruction of my AT-guns within the first couple of turns. Curt's infantry pressed the attack, but my own dug-in infantry, with some help from the mortars, managed to keep them back.


By the end of the game, I had forced Curt's infantry to fall back, but not before managing to pull the objective off the table, denying Curt the chance to grab it even if he had forced his way through.


It was on my right that the tigers managed to tear my armor apart, especially with their ability to re-roll misses. If I had Trained armor instead of Veteran, chances are the Tigers would have gone through them a whole lot faster, and then chewed through my infantry, who's only AT asset was the PIAT gun. The infantry, with support from the platoon in the woods and the MGs, managed to hold back Curt's advancing paratroops. My scout carriers were targeted by the Tigers early in the game, and spent most of their time on the table bailed out. They were the first to go when I had to start withdrawing.


After the Tigers made scrap-metal out of the first armor platoon, I had just enough space to 'ambush' in the second armor platoon, which kept the pressure of my infantry keeping the enemy infantry out of the villa.


It didn't help all that much, as the Tigers pounded round after round into the Shermans. The Shermans, in return, managed to either whiff completely (even with rerolls!) or only bail a single Tiger at a time, which was quickly remounted in the German turns. The German infantry, however, was forced to pull back after taking a beating. As a precaution, I removed the objective in this area the turn after I removed the one on the left.


The platoon in the center had a relatively easy time, albeit being targeted by German mortars for the large part of the game. I was forced, however, to pull both the MG's (who had lost their platoon command) and my mortars off the table as I began to withdraw.

With a platoon of my infantry chasing after Fallschirmjager company commander, and with enough platoons gone to force a moral check, Curt decided to have the rest of his company fall back, giving me the win. He did manage to give me a bloody nose, and with three of my platoons gone it was a 4-3 game.

A big thanks to Curt for the game. Now to finish up his last Fallschirmjager platoon. We'll play a game with fully painted forces yet, mark my words!

Tuesday, January 8, 2013

Miniature Musings - The Death of Hobby Store

Today (I'm writing this on Sunday) began like any other day. After staying up far too late painting miniatures, I awoke and stumbled downstairs for a cup of coffee. While it was brewing, my eyes came upon an article that struck me cold.

Herb's Hobbies and Crafts, a store that has been a local fixture for some 40 years, was finally going out of business.

To tell you the truth, I can't really feel all that surprised. Whenever I went in, there would only be a couple of other people shopping. The displays (Herb's is - was - primarily a store for train modelling) would stay static, and damages that occur never seemed to be fixed. Some of their paints (Vallejo Panzer series, for example) seem to have been sitting there forever, it seems.

And yet I can't speak too badly of the place. If I needed modelling supplies, Herb's was the place to go. Trees, bushes, hedgerows, grass, primer, varnish, paints, brushes, these guys had it all. They had a plethora of books (one of which I bought today) and plastic models of tanks, cars, planes, ships and more. They had kids toys like Knex, dollhouses and other crafts. 

I remember coming to Herb's when I first moved into the area, over a decade ago now. It's going to be strange passing through town and not seeing the store sign lit up at night.

I guess this is my own little plea to anyone who may read this - don't forget about the hobby stores in your area. Frequent them, buy from them, even if you could get a better deal from an online source that isn't in your area.

My hat's off to you, Herb. Thanks for keeping the store running for as long as you did. And good luck to you in future endeavors.

Wednesday, January 2, 2013

Double Action - This Very Ground and Warhammer 40,000 AAR

So I'm going to try to aim for mid-week as an update time, every week. Missed last week because, you know, holidays and all that. That being said, while my painting hasn't been getting done (still working on C's Fallschirmjager), C and I did manage to get in a couple of demo games.

Thou are not yet dead, my Father

The above was the last thing the Senecan Half-king Tanaghrisson said to French Commander Joseph Coulon de Jumonville - technically 'Tu n'es pas encore mort, mon père' - before driving his hatchet into the man's head and using his brains as a hand wash. This was after one of the first major skirmishes of the French and Indian War, which has been a period that I've slowly began to find more and more interest in. I can probably blame one of my college teachers whose class covered the history of the British army.

I've decided to being wargaming the period with 15mm figures from Old Glory's Blue Moon line and Iron Ivan Games' 'This Very Ground' ruleset. You can find a review of the rules over at Anatoli's Game Room, which has sadly gone on hiatus at the moment. Well, what do you know, he's back (and playing another FIW GAME AAAAAARGH). In fact, it was Anatoli's review that really made me want to get a copy of the rules.

This Christmas, my wish came true, and I found not only the rules but enough figures under the tree to try out the first scenario in the game. The scenario featured an Indian attack party attempting to set fire to a stockbuilding, and the local militia's attempt to stop them. Curt gladly took the role as the marauding savages, and I took command of the outnumbered militia.


The above picture shows the game a couple of moves in - the Indians had two warbands (one with the torches needed to burn down the building in the top left of the defensive area) come from his side, while another warband approached from the far left.

The game is an altogether bloody affair - while it can be difficult to hit at times when shooting at someone in cover, or when fighting in close combat, weapons are generally deadly enough that once someone is hit, they're generally going down. This is doubly-so for melee, when both sides fight to the last man. This was demonstrated when the 3 militia in the top left were charged by the 7 Indians near them - while they managed to drag two Indians down with them, the Militia were quickly cut down (and, I'd imagine, scalped).

In the end, the Militia managed to squeak out a win, with only 7 of the original 16 men surviving the fight - their officer managed to get himself killed while trying to hunt down the Indian Sachem. The Indians lost about half their own number (originally 31), but most of those casualties came from the group carrying the torches.

'This Very Ground' turned out to be a fun set of rules, and I'm hoping that Curt will not mind if we break them out a few more times. The American militia are next up on the painting table, followed by the Indians, and then from Canadian Militia.

Warhammer 40k: 6th Edition
Curt received a copy of the 6th edition rules for Christmas and wanted to get a demo game in, to which I agreed. He brought over 500 points worth of Orks (Boyz and Truckz) and Imperial Guard (Veteran Squads and Chimeras).


The game type featured 6 objective markers of various worth (1 worth 4 points, 2 worth 3 points, 2 worth 2 points, and 1 worth 1 point). These were placed by Curt and I, taking turns, and it went that essentially 3 were on my side, and 3 on his.

When they were turned over, to Curt's horror (and my glee!) we found that the 4 and 3 point objectives were on my side, and the 2 and 1 point objectives were on his. All I had to do was lame it out until the end of turn 5 and hope that my fail-dice wouldn't... fail me.

And they didn't! Despite losing one mob of Boyz to Curt's aggressive push on my left, and losing my Warboss to a game of Flashlight tag with a squad of Veterans, I managed to win 7-3. I also received points for blowing up the Imperial Guard Fast Attack choice (a lone Chicken-walker thing whose name escapes me at the moment (edit: Sentinel. Thanks to Curt for pointing that out)) and for getting First Blood (again, Chicken-walker). C received an additional point for killing my Warboss.

Initial thoughts on the limited experience of 6th is that it's... well, it's 40k. The new war-leader-quality roll-off in the beginning didn't have much of a difference on the game. While I like the new 'snapshot' abilities that allow heavy weapons to fire on the move, and the defensive-fire mechanic in melee, I still don't get the 2d6 roll for melee charge (and the first person to utter the word 'cinematic' is getting a Chaos-dreadnought-in-a-sock to the back of the head). While I won't be rushing out to any of the nearby FLGS's to get new 40k stuff, I won't object to when Curt wants to bring his stuff over for a game.

Edit: Curt reminded me of the new vehicle rules. Love 'em. Vehicle HP is easy to follow with the right markers, and the fact that you can't stuck-lock vehicles, while still making them kill-able to glancing hits, means that they can still make a difference around the table.

And that's that! Hopefully I'll be back next week with a new batrep and some actual painting updates.